Dealing with plumbing leaks can be stressful, and costly repairs only add to the worry. Fortunately, affordable DIY plumbing fixes for leaks can help you tackle the issue without breaking the bank.
But did you know you can fix some leaks yourself? In this blog, we’ll explore simple, affordable DIY plumbing fixes for leaks. These fixes can save you money and give you peace of mind. No need for advanced skills or tools. Most leaks are easy to handle with basic knowledge.
Learn how to tackle common issues and keep your plumbing in good shape. Ready to become your own handyman?
Let’s dive into these practical tips and tricks for affordable DIY plumbing fixes for leaks. Your wallet and home will thank you!
Common Plumbing Leaks
Common plumbing leaks can cause significant water wastage and increase your water bill. Thankfully, many of these issues can be fixed with some basic DIY skills. Understanding the types of leaks and how to address them can save you money and prevent further damage.
Faucet Drips
Faucet drips are one of the most common plumbing leaks. Even a small drip can waste gallons of water over time. Most faucet drips result from worn-out washers or seals.
To fix a dripping faucet, turn off the water supply first. Next, disassemble the faucet and replace the faulty parts. This simple repair can stop the drip and save water.
Pipe Leaks
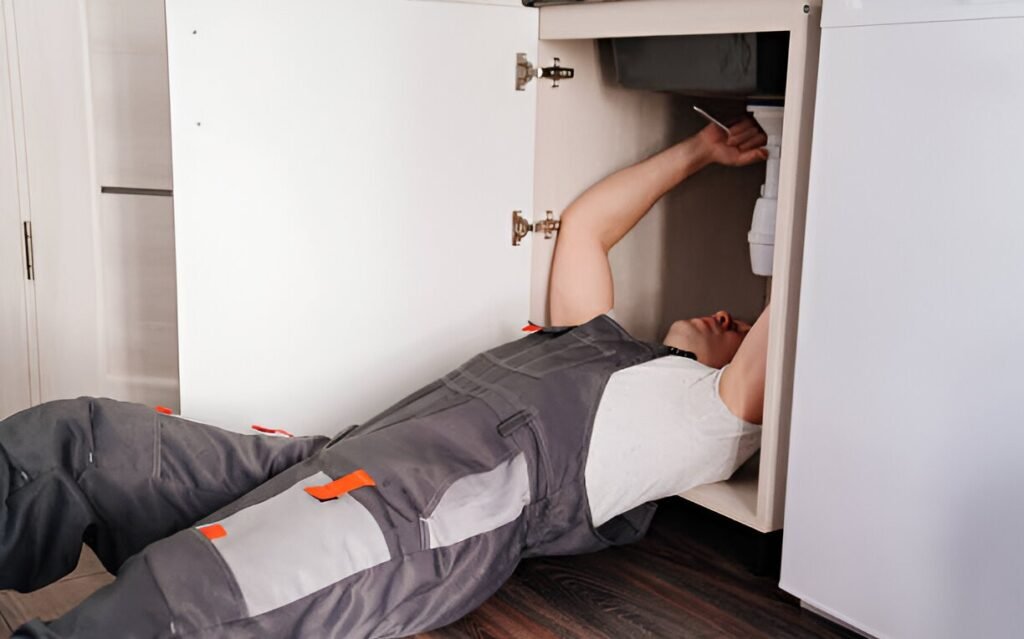
Pipe leaks can occur in various places around your home. Common areas include under sinks and within walls. Pipe leaks often result from corrosion, high water pressure, or improper installation.
To fix a pipe leak, locate the source of the leak first. Once found, you can use pipe repair clamps or epoxy putty for temporary fixes. For a permanent solution, consider replacing the damaged section of the pipe.
Essential Tools
Fixing leaks at home can be easy and budget-friendly with the right tools. You don’t need to call a plumber for every little leak. Some essential tools can help you handle minor plumbing issues yourself. Let’s explore the basic tools you’ll need for DIY plumbing fixes.
Wrenches
A wrench is a must-have tool for any DIY plumbing project. There are different types of wrenches, such as adjustable wrenches and pipe wrenches. An adjustable wrench helps tighten or loosen nuts and bolts. A pipe wrench is used for gripping and turning pipes.
Having both types in your toolkit ensures you can handle various tasks. Always choose a wrench that fits your hand comfortably for better control.
Sealants
Sealants are crucial for stopping leaks in pipes and joints. Teflon tape, also known as plumber’s tape, is commonly used for sealing pipe threads. Wrap it around the threads before connecting pipes to prevent leaks.
Another useful sealant is pipe joint compound, also called pipe dope. It provides a secure seal for threaded pipe joints. Silicone sealant is good for sealing gaps around sinks and faucets. It creates a waterproof barrier that stops leaks effectively.
Quick Fixes For Faucets
Leaky faucets can be a real headache, not to mention the water wastage and the annoying drip-drip sound that can drive anyone up the wall. But fear not, because you don’t need to be a plumbing expert to fix these leaks. There are some quick and affordable DIY plumbing fixes for leaks that can save you time, money, and your sanity. Let’s dive into some simple fixes you can easily tackle on your own.
Replacing Washers
One of the most common causes of a leaky faucet is a worn-out washer. Fortunately, replacing washers is a straightforward task that even beginners can handle. Follow these easy steps:
- Turn off the water supply: Before you start, make sure to turn off the water supply to the faucet. This will prevent any unexpected gushes of water.
- Remove the handle: Use a screwdriver to remove the handle of the faucet. You might find a screw hidden under a decorative cap.
- Take out the old washer: Once the handle is off, you’ll see the valve stem. Carefully remove the old washer from the stem.
- Install the new washer: Replace the old washer with a new one of the same size. It’s important to use a washer that matches the old one to ensure a proper fit.
- Reassemble the faucet: Put the faucet back together by reversing the steps. Turn on the water supply and check for leaks.
Adjusting Handles
If your faucet is still leaking after replacing the washer, the problem might be with the handles. Sometimes, handles can become loose or misaligned, causing leaks. Here’s how you can adjust them:
- Turn off the water supply: As always, start by turning off the water supply to avoid any mishaps.
- Remove the handle: Use a screwdriver to take off the handle. This might require a bit of elbow grease if it’s stuck.
- Tighten the packing nut: Once the handle is off, you’ll see a packing nut. Tighten this nut with a wrench to ensure the handle is firmly in place.
- Realign the handle: Put the handle back on and make sure it’s properly aligned. Sometimes, all it needs is a slight adjustment to stop the leak.
- Test the faucet: Turn the water supply back on and test the faucet. If the handle is properly adjusted, the leak should be gone.
There you have it! These quick fixes for faucets are easy to do and can make a huge difference. No need to call a plumber for these minor issues. With a few tools and a bit of patience, you can tackle these problems yourself. So, roll up your sleeves and get to work – your wallet will thank you, and you’ll feel like a DIY champion!

Simple Pipe Repairs
Dealing with a leaky pipe can be a daunting task. But what if I told you that you could fix it yourself without breaking the bank? Yes, you read that right! With a few affordable tools and materials, affordable DIY plumbing fixes for leaks are totally within reach. Let’s dive into two easy methods for patching up those pesky leaks.
Using Pipe Tape
Pipe tape, also known as plumber’s tape or Teflon tape, is a handy tool for stopping leaks. Here’s how you can use it:
- Turn off the water supply: Before you start, make sure the water supply is turned off. This prevents any water from gushing out while you work.
- Clean the area: Wipe the pipe dry where the leak is. Dirt and moisture can prevent the tape from sticking properly.
- Wrap the tape: Take the pipe tape and wrap it around the leaking area. Ensure you wrap it tightly and cover the leak completely. Typically, 3-4 layers are enough.
- Turn the water back on: Once the tape is secure, turn the water back on and check for leaks. If the leak persists, add another layer or two of tape.
Using pipe tape is like putting a band-aid on the problem – it’s quick, easy, and cheap. Plus, it doesn’t require any special skills or tools.
Applying Epoxy
If pipe tape doesn’t do the trick, epoxy might be your next best bet. Epoxy is a strong adhesive that can seal leaks effectively. Follow these steps:
- Turn off the water supply: Just like with pipe tape, start by turning off the water supply.
- Clean and dry the area: Clean the leaking spot thoroughly and let it dry. Epoxy won’t adhere well to a wet or dirty surface.
- Mix the epoxy: Epoxy usually comes in two parts that need to be mixed. Follow the instructions on the package to mix the right proportions.
- Apply the epoxy: Apply the mixed epoxy to the leaking area. Use a putty knife or your fingers (wear gloves) to spread it evenly over the leak.
- Let it cure: Allow the epoxy to cure as per the instructions on the package. This usually takes a few hours.
- Check for leaks: Once the epoxy has cured, turn the water back on and check if the leak is fixed. If needed, apply more epoxy.
Epoxy is a bit more involved than pipe tape, but it provides a stronger, more permanent solution. Think of it as a superglue for your pipes!
So, whether you’re using pipe tape or epoxy, these simple pipe repairs can save you a lot of money and hassle. Plus, there’s a certain satisfaction in knowing you fixed it yourself. Happy plumbing!
Fixing Toilet Leaks
Toilet leaks can be a nuisance. They waste water and increase bills. Fixing them yourself can save money. Let’s explore two common issues: flapper valve problems and tank seal repairs.
Flapper Valve Issues
The flapper valve controls water flow from the tank to the bowl. A faulty flapper can cause leaks. Check for wear and tear. If the flapper is damaged, replace it. It’s an easy and affordable fix.
First, turn off the water supply. Flush the toilet to empty the tank. Remove the old flapper by disconnecting the chain. Attach the new flapper in its place. Reconnect the chain and turn on the water. Test the toilet to ensure the leak is fixed.
Tank Seal Repairs
The tank seal prevents water from leaking between the tank and the bowl. A damaged seal can cause water to pool around the toilet base. To fix it, you’ll need a new seal.
Start by turning off the water supply. Flush the toilet to empty the tank. Remove the tank from the bowl. Take out the old seal and clean the area. Place the new seal on the bowl. Reattach the tank and secure the bolts. Turn the water back on and check for leaks.
These simple fixes can save you money. They also help conserve water. Try them before calling a plumber.
Preventative Measures
Preventing plumbing leaks can save you money and stress. Taking a few simple steps can help avoid major repairs. Regular inspections and proper maintenance are key.
Regular Inspections
Check your plumbing often. Look under sinks and around pipes. Look for signs of leaks. Watch for damp spots, mold, or rust. Catching leaks early stops bigger problems.
Proper Maintenance
Keep your plumbing in good shape. Tighten loose connections. Replace worn-out parts. Use pipe insulation in cold weather. This prevents pipes from freezing and cracking.
Don’t ignore minor issues. Fix small leaks right away. This prevents them from getting worse. Use plumber’s tape for small leaks. It’s cheap and easy to use.
Safety Tips
Plumbing leaks can cause a lot of damage if left unchecked. Fixing them yourself can save money. But safety is the first priority. Follow these tips to stay safe while fixing leaks.
Shutting Off Water
Always turn off the water supply before starting any plumbing work. This prevents water from spilling out and causing damage. Locate the main water valve in your home. Turn it clockwise to shut off the water. Check that no water flows from the taps before proceeding.
Using Gloves
Wearing gloves is important for safety. Plumbing work can expose you to sharp edges and dirty water. Gloves protect your hands from cuts and germs. Choose rubber gloves for the best protection. Make sure they fit well and are comfortable to work in.
When To Call A Professional
While DIY plumbing fixes can save money, there are times to call a professional. Some plumbing issues are too complex or persistent. Knowing when to seek help is crucial.
Complex Repairs
Some plumbing repairs are too complex for DIY. Tasks like replacing pipes or fixing major leaks require professional skills. Incorrect fixes can cause more damage. Professionals have the right tools and experience. They ensure the job is done correctly. They also prevent future problems. Don’t risk bigger issues by attempting complex repairs yourself.
Persistent Leaks
Leaks that persist after DIY attempts need professional attention. Constant dripping can cause water damage and mold. Professionals can identify the root cause. They provide lasting solutions. Ignoring persistent leaks can lead to higher water bills. It can also damage your home. Save time and money by calling a professional for persistent leaks.
Frequently Asked Questions
How To Stop A Leaking Pipe With Water In It Diy?
Turn off the water supply. Use a pipe clamp or epoxy putty to seal the leak temporarily. For a permanent fix, replace the damaged pipe section.
How Do I Fix A Leaky Pipe Without Replacing It?
Use epoxy putty or pipe repair tape to seal the leak. Ensure the pipe is dry before applying. Tighten connections and joints.
What Is The Average Cost To Fix A Leaking Pipe?
The average cost to fix a leaking pipe ranges from $150 to $350. Prices vary based on the pipe location and severity.
Can You Fix A Water Leak Yourself?
Yes, you can fix a water leak yourself. Basic tools and materials are often sufficient. Consult online tutorials for guidance.
Conclusion
Fixing leaks yourself saves money and prevents bigger issues. Simple tools and steps make a big difference. Remember to turn off the water supply first. Identify the leak source carefully. Use the right materials for repairs. Practice caution and patience.
DIY plumbing can be rewarding and empowering. Seek professional help if needed. Keep learning and improving your skills. Your home will benefit from your efforts. Happy plumbing!


1 thought on “Affordable DIY Plumbing Fixes for Leaks: Quick and Easy Solutions”
Pingback: Fixing Water Damage from Plumbing Leaks: Expert Solutions Revealed - Sweet Home Zone